

domenica 31 marzo 2013
venerdì 29 marzo 2013
Va-va-voom!
Questo è il vestito al quale ho lavorato nelle ultime due settimane e sono particolarmente orgogliosa del risultato! Mi piace, mi piace, mi piace!
Il modello è di Gertie per Butterick, B5882, ovviamente di ispirazione anni '50, va-va-voom!
E ora i dettagli. Ho tagliato il modello taglia 10 per il busto e 8 dalla vita in giù.
Il tessuto è un Silky satin in poliestere: odio il poliestere, ma non ho saputo resistere alla sua lucentezza e poi adoro i pois e questi colori primaverili, così ho ceduto.
Mettere insieme quest'abito non è stato così difficile come pensavo, nonostante sia stata la mia prima volta con una taglia e cuci, con le stecche di rinforzo, con un tessuto scivoloso e con una cerniera inserita a mano. Posso dire di essermela cavata!
È per finire il tutto, voglio realizzare un cardigan dall'aria vintage da indossare insieme al mio B5882. Sto cercando il filato giusto e credo che il tutto sarà pronto giusto in tempo per i festeggiamenti del mio compleanno! Non vedo l'ora di svolazzare insieme a questa gonna a ruota!
This is the dress I worked at in the last two weeks and I'm very proud of it! I love, love, love it!
The pattern is by Gertie for Butterick, B5882, 1950s style of course, va-va-voom!
And now the details. I cut a size 10 for the upper bodice and an 8 for the waist and skirt.
The yarn is a polyester silky satin: I can't stand polyester, but I couldn't resist to its sheen and I love polka dots and this springy colors, so here it is.
Put together this dress hasn't been hard as I thought it would be, even if it was my first time with an overlocker, boning, sliding fabric and hand picked zipper. I can say I managed it all well!
And to finish the ensemble, I want to knit a vintage inspired cardigan to go with my B5882. I'm looking for the right yarn and I think I'll have everything ready for my birthday party! I can't wait to swing around with this full skirt dress!
venerdì 22 marzo 2013
Bugga!
Oggi ho ricevuto questa piccola scatola contenente un tesoro: Skinny Bugga! della Cephalopod Yarns in una (quasi) edizione limitata. Si tratta di una palette di mini matasse in quattro colori diversi, creati per celebrare San Valentino. Sono un po' in ritardo lo so, ma non importa. Adoro i toni del rosso, rosa e viola e queste piccole matassine sembrano fatte proprio apposta per me. Non riesco a smettere di ammirarle tanto sono perfette! Unico dubbio: quale progetto realizzare in modo da esaltarne le sfumature? Avete qualche idea da suggerirmi?
Today I got a treasure in a small box: Skinny Bugga! by Cephalopod Yanrs in a (almost) limited edition. It is a mini skeins palette in four different colors, created to celebrate Saint Valentine's Day. I'm in late, I know, but I don't care. I love reds, pinks and purples and these little skeins are made for me. They are perfect and I can't stop admiring them! I've just a doubt: which pattern to choose in order to enhance their shades? Do you have any suggestions?


Today I got a treasure in a small box: Skinny Bugga! by Cephalopod Yanrs in a (almost) limited edition. It is a mini skeins palette in four different colors, created to celebrate Saint Valentine's Day. I'm in late, I know, but I don't care. I love reds, pinks and purples and these little skeins are made for me. They are perfect and I can't stop admiring them! I've just a doubt: which pattern to choose in order to enhance their shades? Do you have any suggestions?
sabato 16 marzo 2013
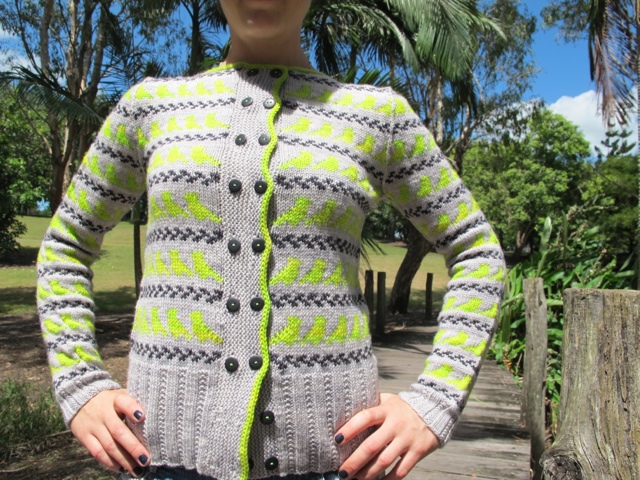
Little Birds
Finalmente vi posso far vedere il mio Little Birds! Erano settimane che aspettavo il sole per poterlo bloccare e fotografare.
Ho drasticamente modificato il modello ed ecco qui come...
- Ho avviato 177 m con ferri da 3 mm per il corpo e dopo le coste sono passata a quelli da 3,5 mm, unendo in tondo il lavoro e avviando 7 m per lo steek.
- Subito dopo le coste ho aumentato una m, in modo da avere un totale di 178 (multiplo di 8 - ovvero il motivo - più 2 m per la parte centrale del dietro).
- Ho ridisegnato lo schema in modo che gli uccellini andassero in due direzioni opposte a partire dal davanti, per incontrarsi faccia a faccia sul dietro.
- Per lo scollo non ho seguito lo schema, ma ho diminuito le maglie solo a pochi giri dalla fine del davanti, in modo da avere un cardigan più coprente.
- Per la manica ho avviato 48 m con ferri da 3 mm e dopo le coste sono passata a quelli da 3,5 mm.
- Per gli aumenti ho seguito lo schema per la taglia s/m e ho proseguito fino a 48 cm circa di lunghezza. Ho poi unito maniche e corpo, come da istruzioni.
- Per la banda dei bottoni ho preso spunto da un altro modello di Ysolda, Laika, lavorando il bordo a legaccio ed aggiungendo una seconda fila di bottoni, per un totale di 18.
- All'interno, ho rifinito lo steek a punto festone.
Che ne dite, vi piace? :)
Finally I can show you my finished Little Birds! I've been waiting for weeks for the sun to come out to block and photography this cardigan.
I drastically modify the pattern and here it is how I did it...
- For the body I CO 177 sts with 3 mm needles and after the ribbing I switched to 3,5 mm, joined in the round and CO 7 sts for the steek.
- After the ribbing I increased 1 st to get a total of 178 (multiple of 8 - the pattern repeat - plus 2 sts for the centre back).
- I draw a new chart in order to let the birds go in opposite direction from the front towards the back so they face each other at the centre back.
- I didn't follow the pattern for the neckline, I instead knitted straight until close to the ind of the front, decreasing the stitches just in the last few rows in order to have a cardigan a little more closed.
- For sleeves I CO 48 sts with 3 mm needles and switched to 3,5 mm after the ribbing.
- For the increases I followed the chart for the s/m size lengthening the sleeves to about 48 cm. I then joined body and sleeves as per instructions.
- For the button band I was inspired by another Ysolda's cardigan, Laika, so I knit the border in garter stitch and I add a second row of buttons, for a total of 18.
- On the wrong side I finished the steek with a blanket stitch.
What do you reckon? Do you like it? :)
Iscriviti a:
Post (Atom)